Mod Controller
I 10 migliori prodotti di ottobre 2025
Ultimo aggiornamento:
6 ottobre 2025
Collective Minds
Collective Minds FPS Strike Pack Standard [PlayStation 4] || non utilizzabile su PC, nero
Spedizione gratuita
99
QUALITÀ MASSIMA
VEDI SU AMAZON
Amazon.it
#1 VINCITORE
▼ Mostra di più
▲ Mostra di meno
Adatto SOLO per i controller PS4.
Centinaia di mod del controller sono prontamente disponibili.
inclusi fuoco rapido, drop shot e quickscope.
NOTA: per ulteriori informazioni, consulta i manuali e i documenti del prodotto.
NOTA: auricolare audio da 3,5 mm, compatibile con il modello di controller CUH-ZCT2U e versioni successive. Il controller CUH-ZCT1U originale NON è supportato per l'audio delle cuffie da 3,5 mm: è necessario un auricolare USB.
59,48 € SU AMAZON
EasySMX
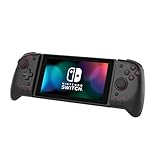
EasySMX D10 Controller PC Wireless – Joystick TMR, Grilletti Dual-Mode, Tasti Meccanici, Polling 1000Hz, RGB – Bluetooth Gaming Controller per PC/Switch/Switch 2/ iOS con Dock di Ricarica–Nero
Spedizione gratuita
96
QUALITÀ SUPERIORE
VEDI SU AMAZON
Amazon.it
#2
▼ Mostra di più
▲ Mostra di meno
🎮【Controller PC Wireless di Nuova Generazione】Progettato per i giocatori competitivi, il D10 controller pc offre bassa latenza e piena compatibilità con PC, Switch, Android e iOS. È anche un regalo perfetto per compleanni, Natale o qualsiasi altra occasione speciale.
🎮【Esclusivo D-pad EasyPos】Grazie all'esclusiva tecnologia EasySMX EasyPos, il D-pad del D10 joystick pc offre movimenti rapidi e precisi in 8 direzioni, ideale per giochi retrò e di combattimento. Un regalo ideale per gli appassionati di giochi classici.
🎮【Joystick TMR - Anti-deriva e Ultra Precisi】Il D10 controller pc wireless utilizza il joystick TMR. I sensori TMR offrono maggiore precisione e durata rispetto ai sensori Hall. Con oltre 5 milioni di cicli, sono perfetti per sparatutto in prima persona e giochi di corse. È un'ottima scelta per i giocatori competitivi.
🎮【Trigger a Doppia Modalità per Tutti i Tipi di Giochi】I grilletti lineari Hall sono ideali per i giochi di corse e sparatutto. I grilletti micro-touch sono adatti per i giochi d'azione e di combattimento. Il gamepad EasySMX D10 pc controller può passare liberamente dai grilletti lineari a quelli micro-touch per soddisfare le esigenze di diversi tipi di gioco. Non importa quale gioco piaccia al tuo amico, questo è un regalo super pratico e speciale.
🎮【Pulsanti Completamente Meccanici】Il EasySMX D10 joystick pc wireless è dotato di pulsanti meccanici con una corsa di 1,0 mm e una durata di oltre 5 milioni di clic, offrendo una risposta rapida e tattile simile a quella di una tastiera meccanica. Ideale per chi cerca un'esperienza di gioco su PC di livello d'élite e un regalo perfetto per i gamer più appassionati.
🎮【Frequenza di Polling di 1000 Hz (Cablata e 2.4G)】 Con il EasySMX D10 gamepad per pc, ottieni un tempo di risposta di livello professionale con una frequenza di polling di 1000 Hz, riducendo al minimo la latenza sia in modalità cablata che wireless 2.4G per il gaming competitivo. Un'ottima scelta regalo per i gamer che cercano precisione e prestazioni al top.
【Nota】 ✅ Compatible con PC con Windows, Android, Switch, Switch 2 e iOS. ❌ No compatible con Xbox, Amazon Luna ni GeForce Now.
59,99 € SU AMAZON
Semaiki
Paddles Strike per controller PS4, attacco per il pulsante posteriore Controller PS4, attacco per il pulsante posteriore F.P.S. Dominator Mod Kit per controller PS-4
15% Sconto
Spedizione gratuita
96
QUALITÀ SUPERIORE
VEDI SU AMAZON
Amazon.it
#3
▼ Mostra di più
▲ Mostra di meno
Impostazione della funzione di programmazione - Premere a lungo il pulsante SET per 2 secondi, il LED corrispondente a × lampeggia rapidamente (4HZ), quindi premere brevemente il pulsante M1 o M2, il LED lampeggia lentamente sul display della funzione corrispondente (la sequenza di lampeggiamento è X, ○, △, □, R3, L3, R2, L2, R1, L1).
Impostazione della funzione di programmazione - Quindi premere il pulsante SET, la funzione corrispondente sarà mappata su M1 / 2; ad esempio: quando si entra in modalità di programmazione, premere il pulsante M1 per visualizzare il LED su R1, quindi premere nuovamente il pulsante SET, il LED su R1 diventa a luce lunga, la funzione M1 è R1; quando si programma M2, è simile a quanto sopra.
Annullamento della funzione - Premendo a lungo il tasto SET per 5 secondi, il LED di programmazione passa da lampeggiante veloce a spento e la funzione M1 / 2 viene annullata.
Funzione di memoria del pulsante di programmazione - Inserire il pulsante di estensione posteriore nell'impugnatura, se M1 / 2 non ha alcuna funzione, il LED1 lampeggerà lentamente (2HZ) per 3 secondi e poi si spegnerà, premere a lungo il pulsante SET per entrare nella modalità di programmazione e quindi il LED1 lampeggerà rapidamente. Se M1 / 2 ha memorizzato l'ultima funzione di programmazione, il LED corrispondente si accende a lungo.
Impostazione della funzione TURBO - Tenendo premuto contemporaneamente il pulsante di funzione e il pulsante Turbo, il pulsante di funzione attiva la funzione Turbo burst; premere di nuovo il suddetto pulsante combinato per annullare la funzione Turbo. Se la funzione Turbo è attiva, dopo aver premuto il pulsante, il LED corrispondente alla funzione lampeggia rapidamente (4HZ).
14,99 € SU AMAZON
GameSir
GameSir Nova Lite Controller Wireless, Connettività Tri-mode, Gamepad joystick per PC Windows/Switch/Stem/iOS/Android, con grilletto ad effetto Hall, DualVibration, Turbo, Motion (Viola scuro)
Spedizione gratuita
88
QUALITÀ DISTINTA
VEDI SU AMAZON
Amazon.it
#4
▼ Mostra di più
▲ Mostra di meno
Il controller di gioco wireless GameSir T4 Nova Lite è compatibile con Windows 10/11, Switch, Android, iOS e Steam Deck. (Dongle 2.4G e cavo USB sono inclusi).
I joystick GameSir Hall Effect sono specifici per le prestazioni dei joystick No Dead Zone e No Drifting.
Il controller per PC T4 Nova Lite offre la stessa esperienza precisa e coinvolgente con trigger lineari del popolare controller PS5, migliorando il divertimento del gioco.
Goditi una flessibilità senza pari con tre opzioni di connettività: Bluetooth, dongle wireless 2.4G e USB-C. Passa da un dispositivo all'altro senza sforzo per un'esperienza di gioco senza problemi.
Il controller Bluetooth è dotato di una funzione Turbo a 20 Hz con pulsanti personalizzabili, inclusi A/B/X/Y/LB/LT/RB/RT. I giocatori possono facilmente attivare o disattivare la funzione Turbo premendo il pulsante M, fornendo un modo conveniente per migliorare il gameplay. Libera le dita e immergiti completamente nell'esperienza di gioco.
Batteria integrata da 600 mAh del controller Bluetooth T4 Nova Lite, dura fino a 10 ore di riproduzione quando è completamente carica in 2 ore.
Pulsante M multifunzione per un controllo conveniente: regola facilmente varie impostazioni con il pulsante M multifunzione, dall'intensità delle vibrazioni, al layout ABXY alla zona morta degli stick.
35,99 € SU AMAZON
8Bitdo
8BitDo Ultimate 3-mode Wireless Controller for Xbox, Hall Effect Joysticks, Pro Back Buttons, Compatibility with Xbox Series X|S & Xbox One, Apple, Windows PC & Android - Rare 40th Anniversary Edition
Spedizione gratuita
88
QUALITÀ DISTINTA
VEDI SU AMAZON
Amazon.it
#5
▼ Mostra di più
▲ Mostra di meno
Festeggia i 40 anni di Rare con il primo controller Xbox wireless 2.4G di 8BitDo. Licenza ufficiale di Xbox e Rare Ltd.
Ultra compatibilità. Collegatevi alla vostra Xbox o al vostro PC Windows via wireless 2.4G o USB cablata, oppure ai vostri dispositivi Apple o Android via Bluetooth.
Joystick e grilletti a effetto Hall. Grilletto a impulsi e vibrazione (solo su Xbox e Windows)
2 pulsanti posteriori Pro. D-pad tattile in metallo dorato. Jack audio da 3,5 mm. 3 profili personalizzati. Supporto 8BitDo Ultimate Software X.
Dock di ricarica integrato - Un dock di ricarica perfettamente integrato mantiene il controller sempre carico e pronto a giocare. Si ricollega automaticamente quando viene rimosso dal dock.
79,99 € SU AMAZON
Wiley-IEEE Press
Methods of Developing Sliding Mode Controllers: Design and Matlab Simulation (IEEE Press Series on Control Systems Theory and Applications) (English Edition)
82
QUALITÀ AFFIDABILE
VEDI SU AMAZON
Amazon.it
#6
Springer
Sliding Mode Controllers for Power Electronic Converters (Lecture Notes in Electrical Engineering Book 534) (English Edition)
80
QUALITÀ BUONA
VEDI SU AMAZON
Amazon.it
#7
Nova Science Pub Inc
Applications of Various Fuzzy Sliding Mode Controllers in Induction Motor Drives
48% Sconto
78
QUALITÀ BUONA
VEDI SU AMAZON
Amazon.it
#8
Controller-Kompetenzmodell: Leitfaden für die moderne Controller-Entwicklung mit Muster-Kompetenzprofilen
72
QUALITÀ BUONA
VEDI SU AMAZON
Amazon.it
#9
Hori
Hori Nintendo Switch Split Pad Pro (Black) Ergonomic Controller for Handheld Mode Only - Officially Licensed By Nintendo - Nintendo Switch
64
QUALITÀ BUONA
VEDI SU AMAZON
Amazon.it
#10
▼ Mostra di più
▲ Mostra di meno
Full-size controller experience in handheld mode
larger , buttons, triggers, analog sticks, and D-pad
programmable rear buttons, Turbo, Assignable buttons, and more
translucent Black design
Officially licensed by Nintendo
67,35 € SU AMAZON
controller mod
controller mod ps4
controller ps4 mod
mod controller ps4
ps4 controller mod
controller ps5 mod
mod controller ps5
mod ps5 controller
ps5 controller mod
controller xbox mod


 #1 VINCITORE